The Raspberry Pi Foundation has revealed its latest product, the Raspberry Pi Zero 2 W, after the introduction of the Raspberry Pi Zero W in 2017 as an upgrade to the Raspberry Pi Zero from 2015.
While the Raspberry Pi Zero 2 W is an excellent addition to the Raspberry Pi family, it promises to revolutionize existing Pi Zero applications and offer up new avenues.
“It’s been nearly six years since we unleashed the $5 Raspberry Pi Zero on an unsuspecting world. Of all the products we’ve launched, Zero is still the one I’m proudest of” – Eden Upton, Founder of the Raspberry Pi.
What is a Raspberry Pi Zero?
The Raspberry Pi Zero is a single-board computer (SBC) that is even smaller than the Raspberry Pi.
While the conventional Raspberry Pi 4 is similar size as a credit card, the Raspberry Pi Zero is about one-third the size. This tiny computer can perform many of the same functions as its bigger counterparts.
The Raspberry Pi Zero gained wireless functionality with the Raspberry Pi Zero W (Wireless), although it misses several of the ports and connections found on a normal Pi. The Raspberry Pi Zero W, with its wireless LAN and Bluetooth capabilities, is suitable for developing embedded Internet of Things (IoT) projects. With tiny connections and an unpopulated 40-pin GPIO, the Pi Zero W is meant to be as versatile and small as possible, letting you to utilize exactly what your project requires.
Raspberry Pi Zero 2 W Specs
The Raspberry Pi Zero 2 W is essentially a buffed version of the original Pi Zero, along with an updated CPU and a few of additional improvements.
Most crucially, the Pi Zero 2 W uses the same Broadcom BCM2710A1 quad-core 64-bit SoC with an ARM Cortex-A54 processor at 1GHz as the Raspberry Pi 3. This increases the SBC's speed by around five times when all four cores are used, and it boosts into Raspberry Pi OS three times quicker. Unfortunately, due to technological constraints, the device's RAM has been limited to 512MB.
The device supports OPEBGL ES 1.1 and 2.0 graphics, as well as H.264 and MPEG-4 decoding and encoding at 1080p30. The Pi Zero 2 contains a single micro-USB 2.0 interface with OTG functionality in addition to the micro-USB power connector. A Mini HDMI port, a CSI-2 camera connection, and a 40-pin GPIO array are also included. Unlike the ordinary Raspberry Pi, the Pi Zero 2 W does not come with GPIO pins, but you may purchase them separately.
Finally, the Raspberry Pi Zero 2 W comes with 2.4GHz 802.11b/g/n wireless networking, as well as Bluetooth 4.2 and BLE.

Price and Availablity
The Raspberry Pi Zero was initially released in 2015 for $5 and was later upgraded in 2018 to include Wi-Fi and Bluetooth, resulting in the Raspberry Pi Zero W for $10.
The Raspberry Pi Zero 2 W is available for $15. It may cost $5 more than its predecessor, but it provides far better performance. It is now available in the UK, the European Union, the US, Canada, and Hong Kong. As they finish their radio compliance work, they will add more nations, with Australia and New Zealand coming up first in November.
4 Easy Steps to Connect the Raspberry Pi Zero 2 W to Your AutoPi Gen2
The Raspberry Pi Foundation developers were able to fit all of the hardware improvements inside the original Zero's compact size. As a consequence, you may use practically all Zero W cases and accessories with the Zero 2 W, including the AutoPi Gen2 device.
To get started with the Pi Zero form factor, you'll need a few more peripherals. A mini-HDMI to HDMI converter is required in addition to the standard microSD card and power source. A USB OTG adapter or a micro-USB to USB converter is also required for text entry. After installing the operating system for the Pi Zero (Raspbian is the best option), the computer may be booted using a sufficient power supply. A 5.1V/2.5A mains power adaptor is ideal for this.
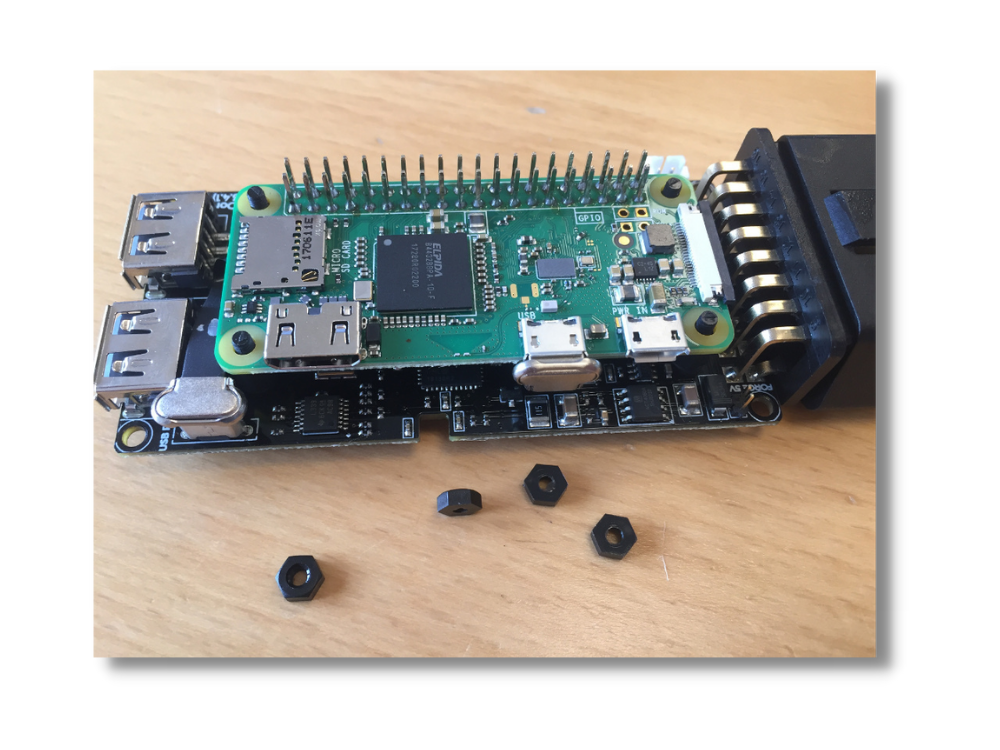
If you already possess an AutoPi device, you can just follow these 4 easy steps. (OBS. Pictures are from Raspberry Pi Zero W, but it is essentially the same steps.)
OBS. If you want an in-depth explanation on how to upgrade/replace your Raspberry Pi computer, click here for our documentation guide.
-
Get your Raspberry Pi Zero 2 W and the 40-pin header from your AutoPi device.

-
Solder the pin header to the Raspberry Pi.

-
Connect the flat micro-USB cable that came with your AutoPi.

-
Mount the Raspberry Pi on the AutoPi. Reuse the screws that came with your AutoPi, to fasten the device to the Pi.


